How to Install Slamious Kodi Build
>
In this guide, you will learn to install Slamious Build on Kodi. The steps provided here work on FireStick, Mac, Linux, Windows, Mobiles, Raspberry Pi and more.
Slamious comes from the big catalog of Slamious Wizard. Even though Slamious Wizard has many builds, Slamious Kodi build clearly stands out. This thoughtfully designed build is perfect for not just the beginners but also the experienced users.
The build takes care of all your streaming needs through the top Kodi addons that come preinstalled with it. The user-friendly interface makes sure you never experience any difficulty while exploring and navigating the build. Almost everything you need is already available on the main-screen.
When I started using this build, I was clear I will write you a guide and also include it in our list of Best Kodi Builds.
Please click here to read our Disclaimer before you proceed.
How to Install Slamious Build on Kodi
The build installation process is easy but usually long-drawn. So, let’s break it down into two broad parts so that it is easier for you to follow. Here is what we are going to do:
Part 1: Allow Builds from the Unknown Sources (prerequisite)
Part 2: Install Slamious Kodi Build
We can now start with each part separately.
Attention: Kodi Builds bring unlimited streaming content, but could also get you in a legal trouble. Kodi users must use a VPN to hide their identity while streaming movies / TV Shows / Sports. Moreover, many popular Addons are geo-blocked and will require a VPN to work.
I personally use and recommend ExpressVPN which is the best VPN for Kodi. You can get 3-months free and save 49% on its annual plans.
Part 1: Allow the Unknown Sources
Slamious is a third-party Kodi build. When you try to install such a build, the internal security system of Kodi will prevent you from doing so. This is to make sure no malicious programs get installed automatically. Slamious build is safe. Therefore, we will bypass this restriction by following these steps:
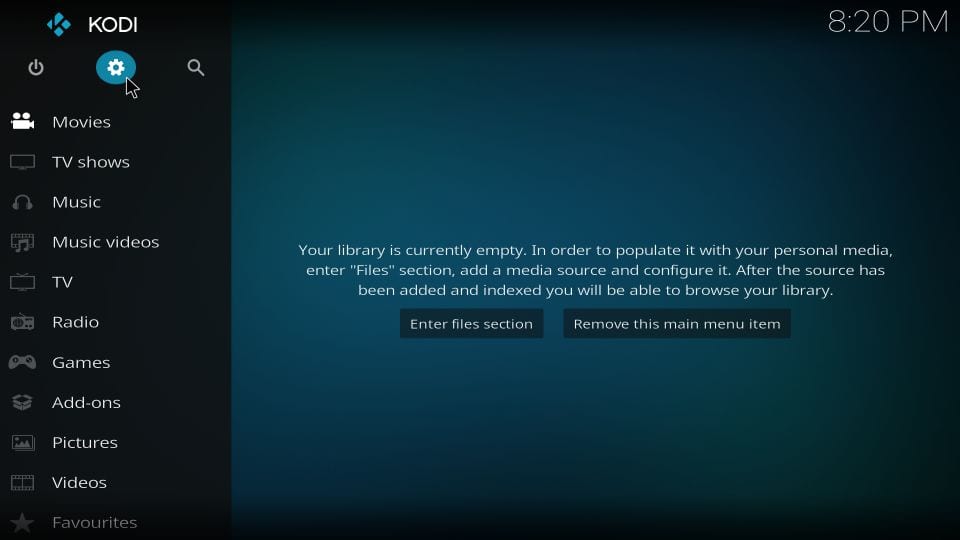
#1: Access Settings from the home screen of the Kodi application. You will find this option in the top-left
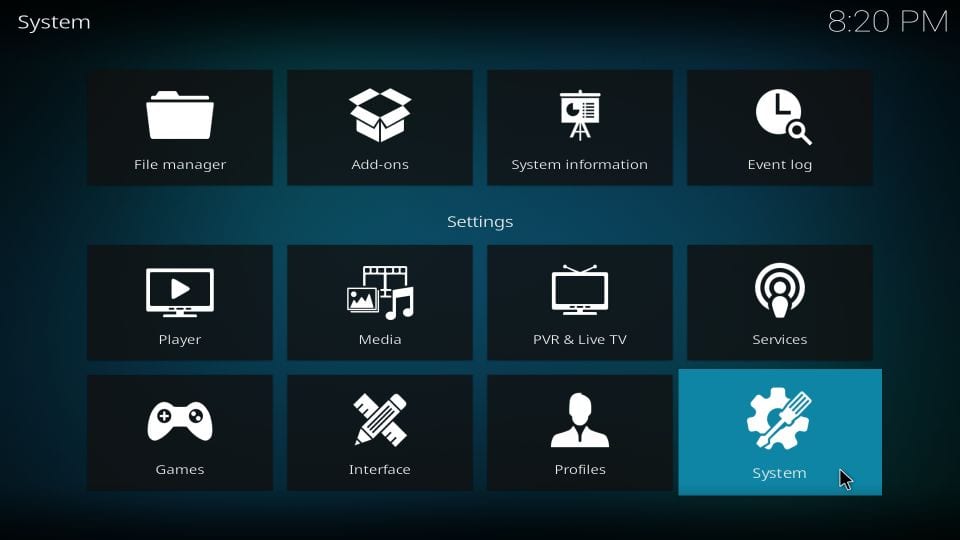
#2: Open the item System on the following screen
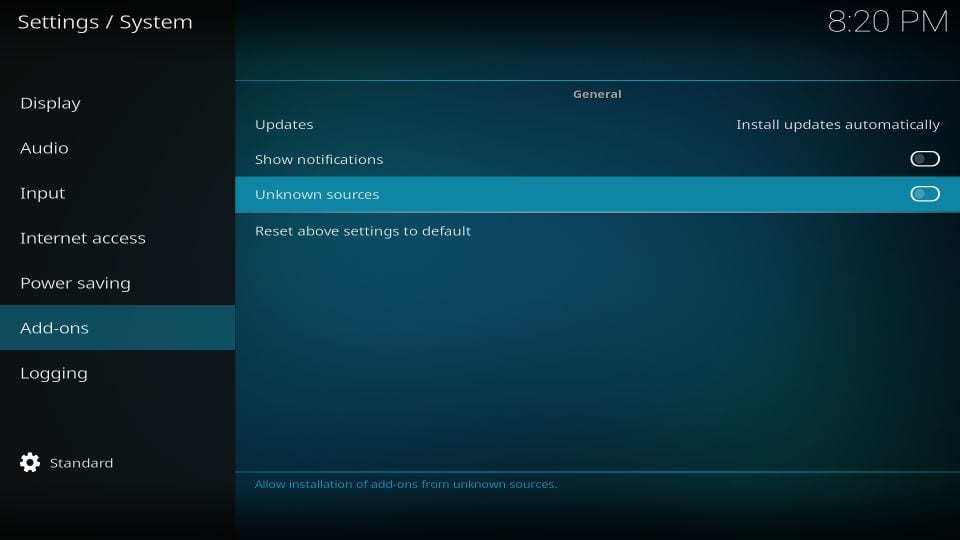
#3: What you need to select now is the item on the left Add-ons. When you do that, you see related options on the right. One of them is Unknown Sources. This is the option you want to make sure is ON. Switch its toggle and turn it ON if it is OFF
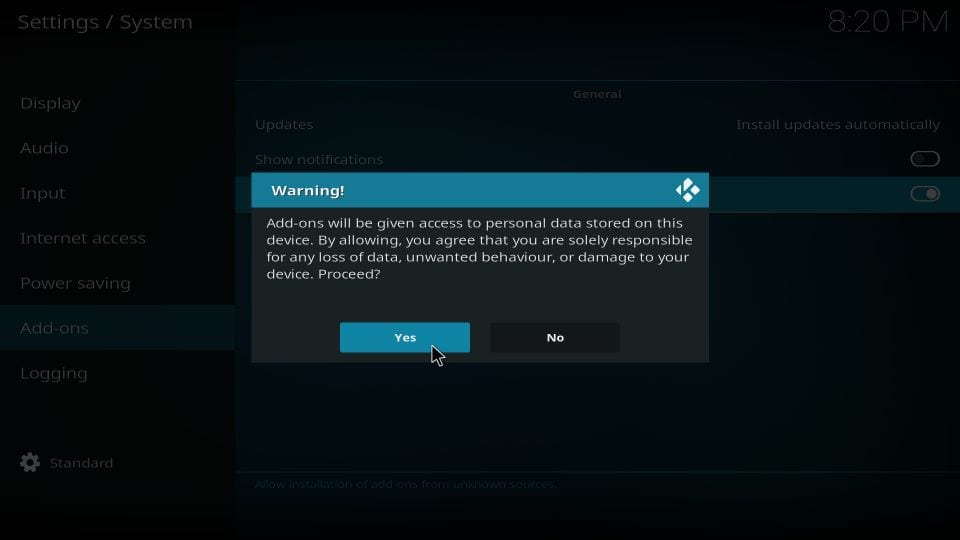
#4: When this warning is displayed on your screen, go ahead and click Yes. Again, you are ignoring this warning because Slamious Kodi build is a hundred percent safe.
Part 2: Install Slamious Build on Kodi
Now, you may install the build on Kodi. The installation process will include adding the source path/link, installing Slamious Wizard and eventually installing the Slamious Kodi build. We are going to cover everything in the steps that follow:
#1: Access the Kodi Settings again

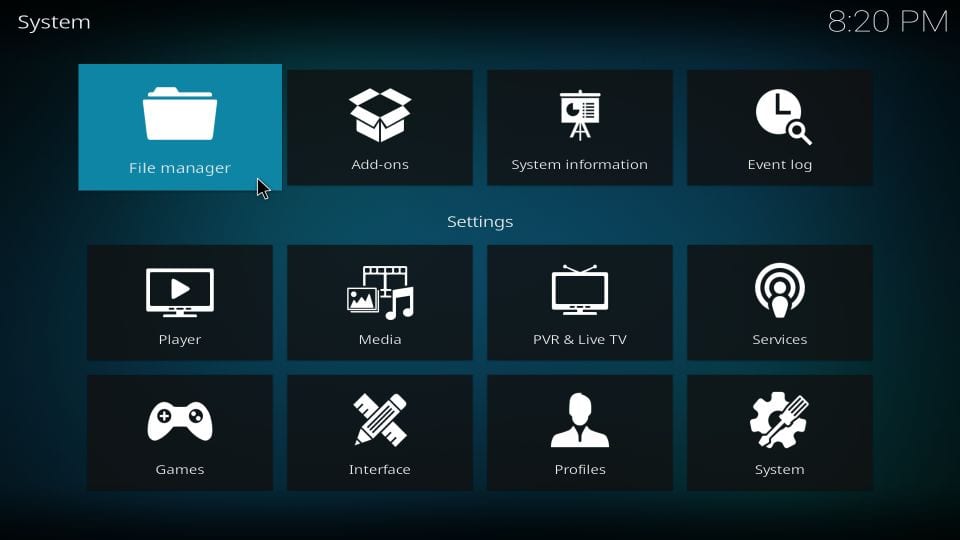
#2: Now go to the File manager and open it
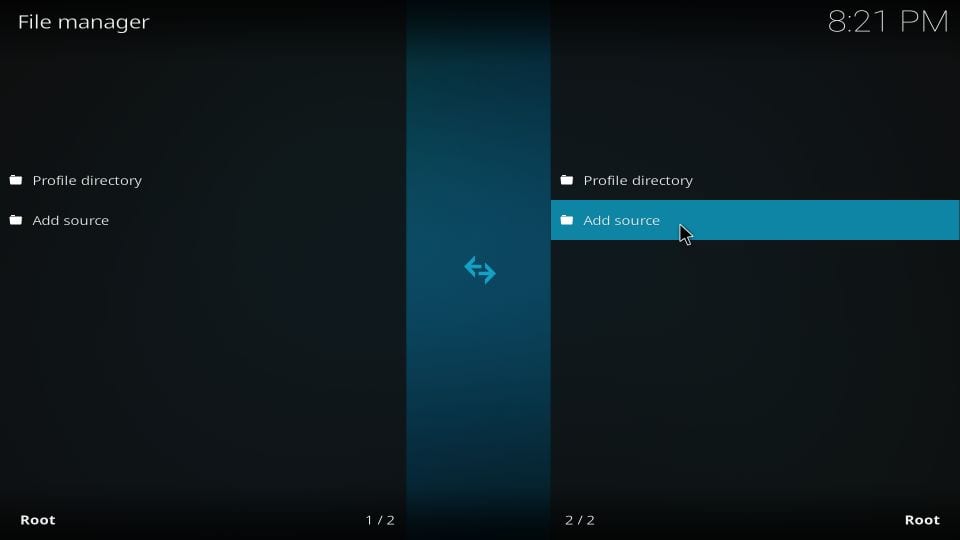
#3: Choose the option Add source on the next window (either side)
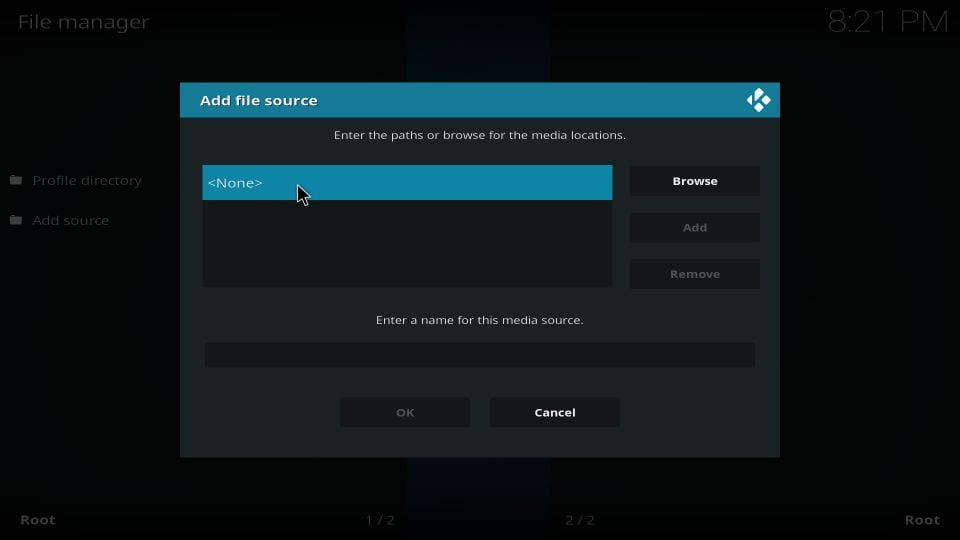
#4: Go ahead and click on the following popup window
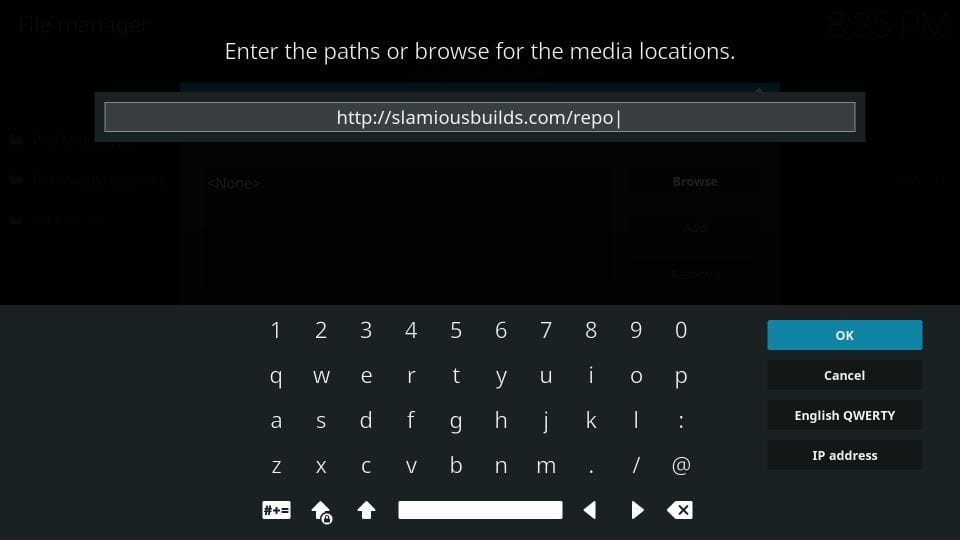
#5: When prompted, enter the following link in the designated area: http://slamiousbuilds.com/repo
Click OK to proceed
#6: Now highlight the area where it asks you to enter the name for the media source. Type a name you can remember. You may enter slamious as I did
Click OK
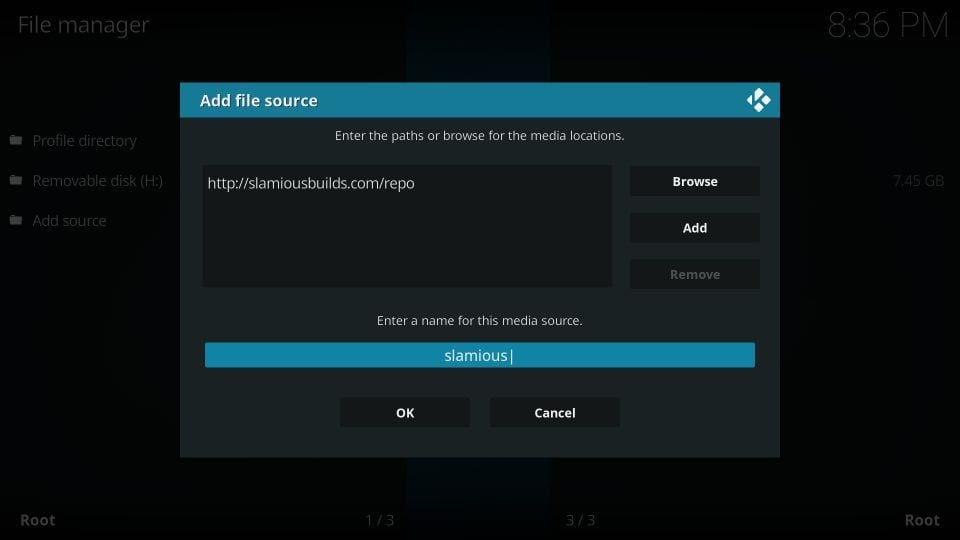
You have successfully added the source link. We get to the next part now: Install Slamious Wizard
#7: Now go back to the Kodi Settings and click Add-ons
Note: If you still use Kodi 17.6, go to the home screen and click Add-ons, followed by the open box icon in the upper left corner
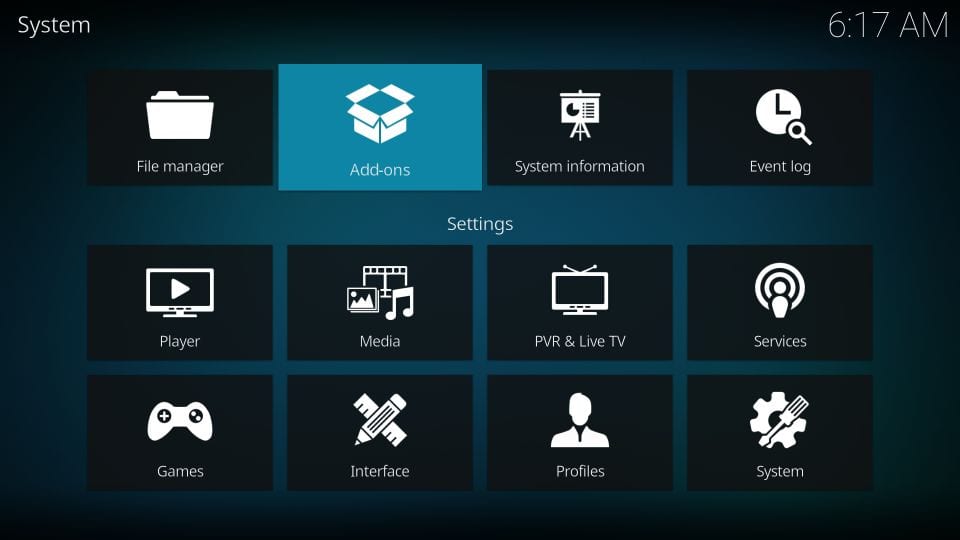
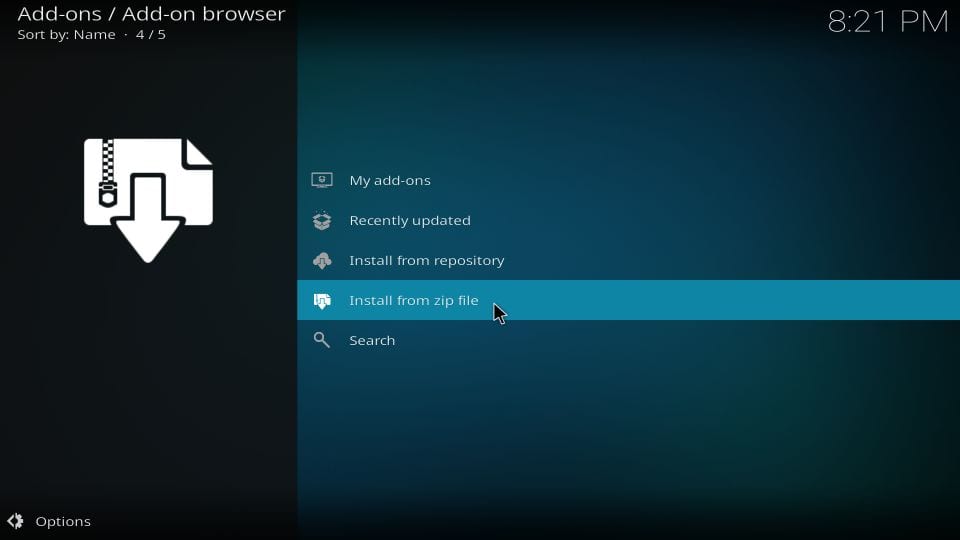
#8: Open the option Install from zip file
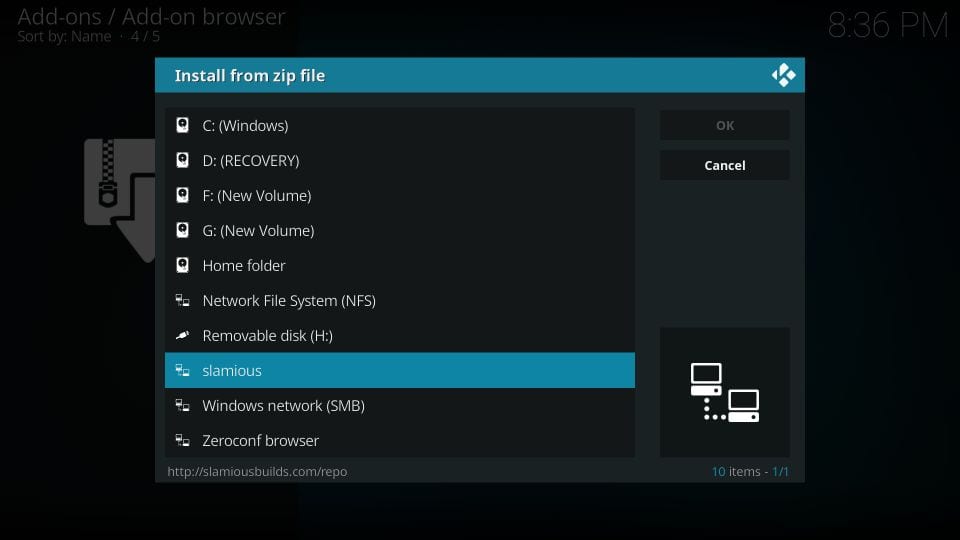
#9: Go ahead and click slamious or the name that you chose earlier
#10: You should now see a zip file on this screen. Click it. It is named Slamious Repo.zip
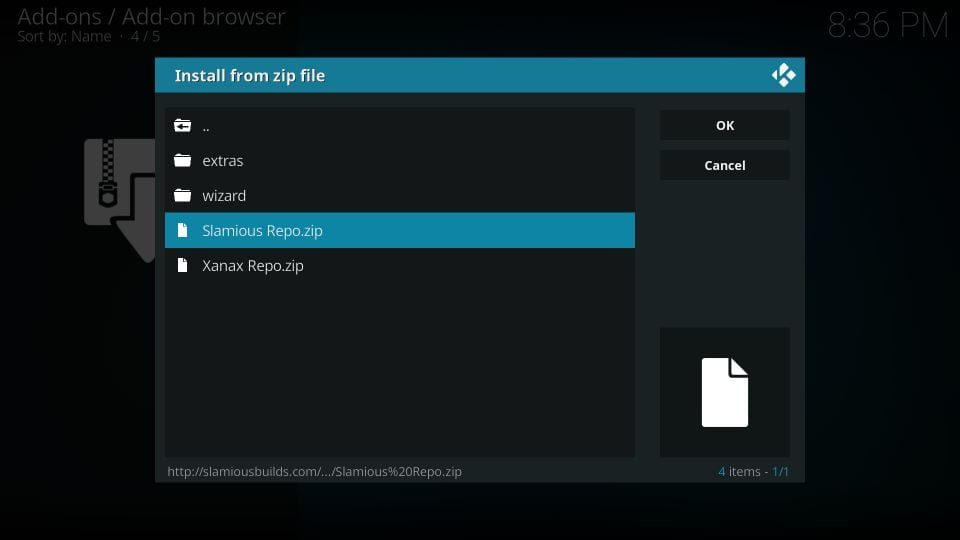
#11: Wait for the Slamious Repo Add-on installed message. It is displayed in the top-right corner.
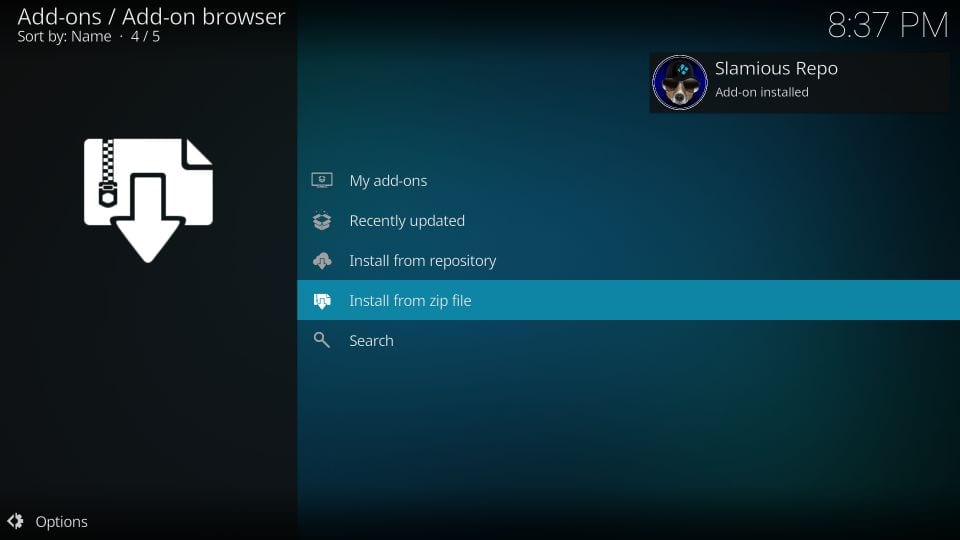
#12: Now, click Install from repository
#13: Click Slamious Repo
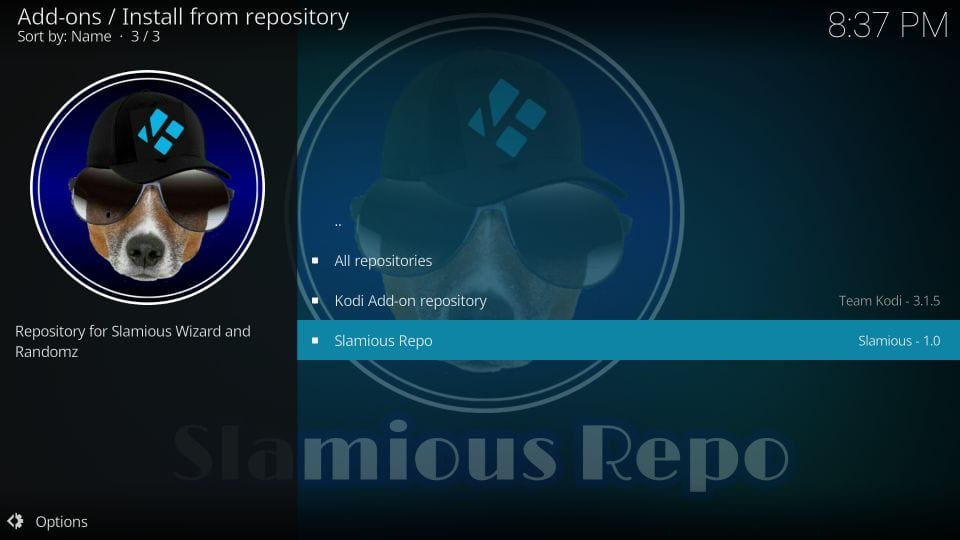
#14: Click Program add-ons
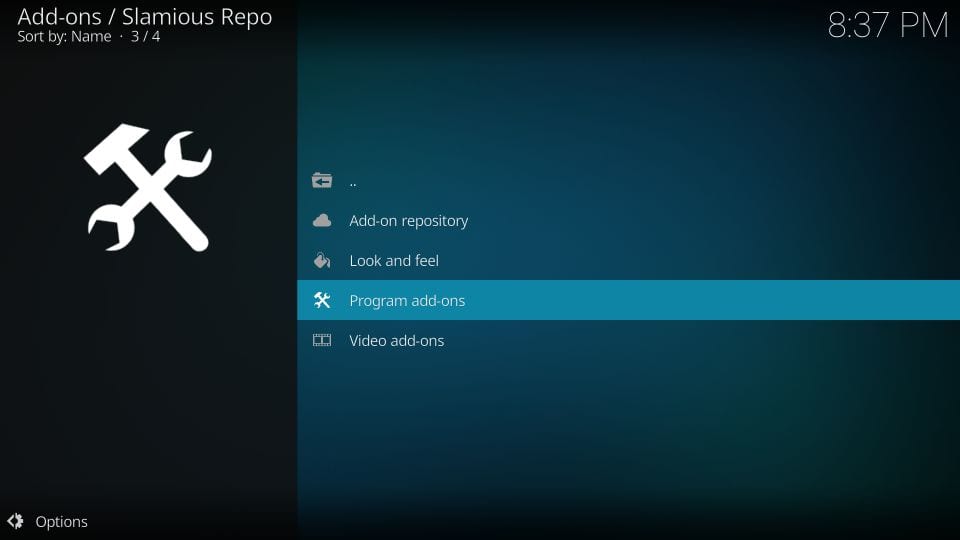
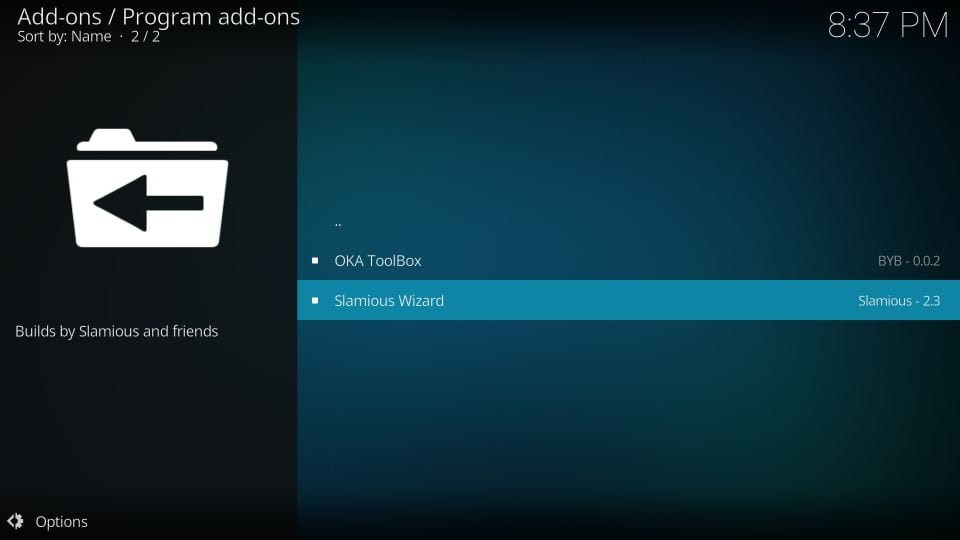
#15: Open Slamious Wizard
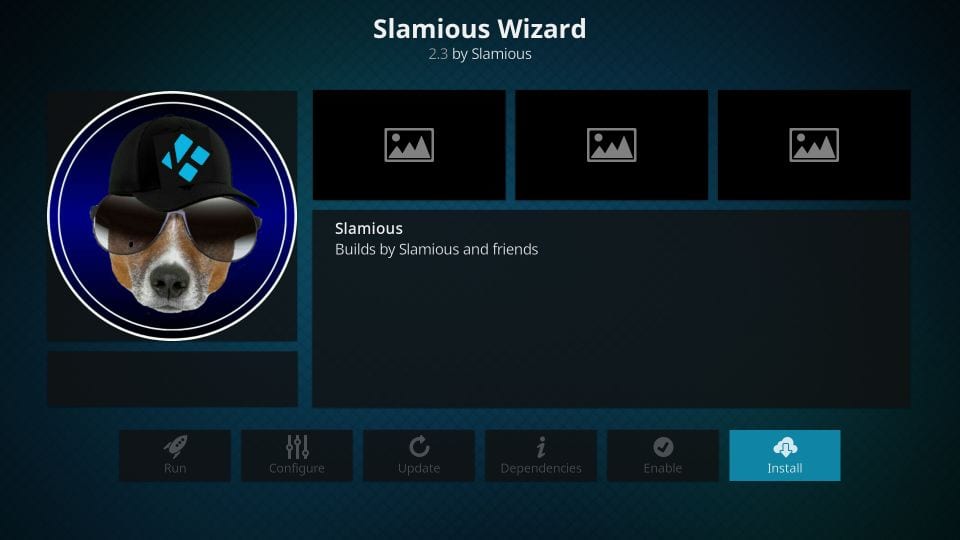
#16: Click Install
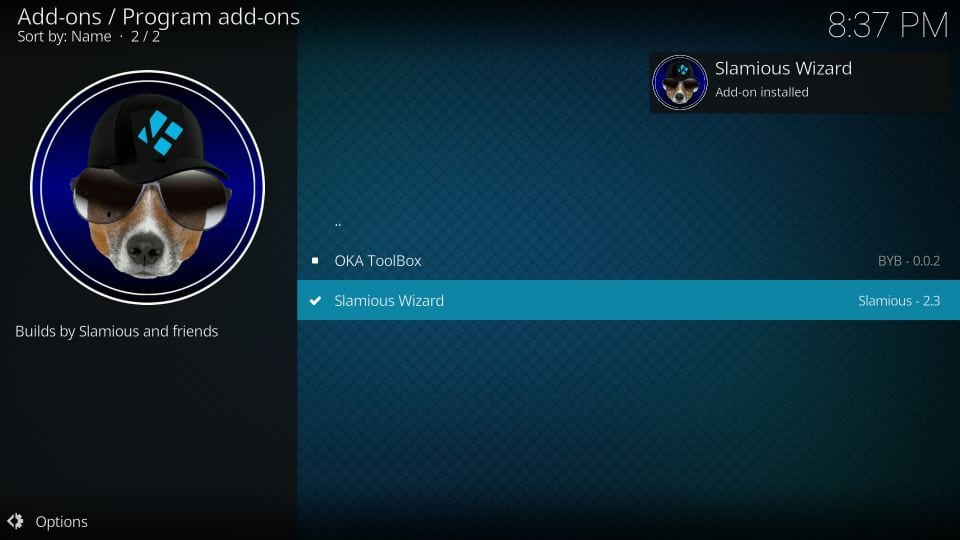
#17: Wait for the Slamious Wizard Add-on installed message
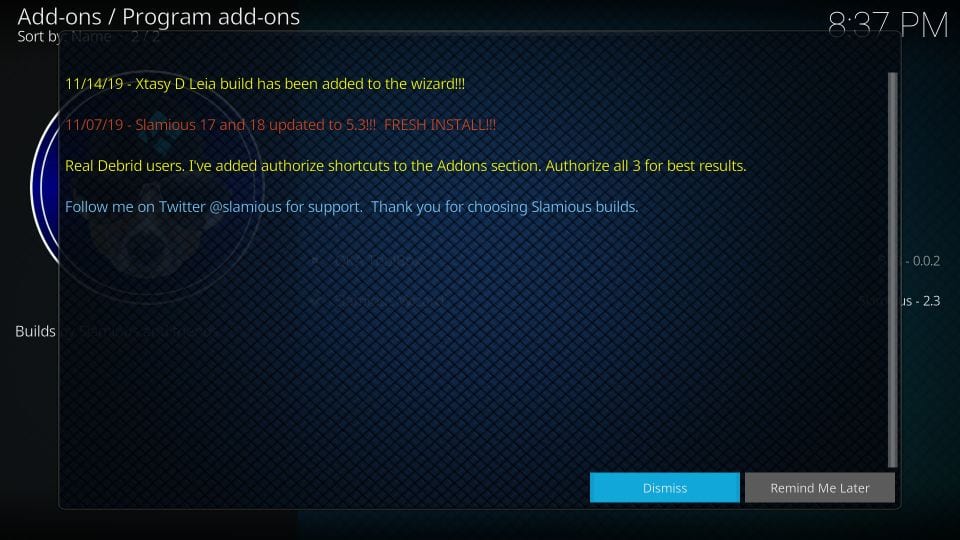
#18: Click Dismiss when this prompt is displayed
#19: You may now see a popup window with a set of Settings. Click Continue.
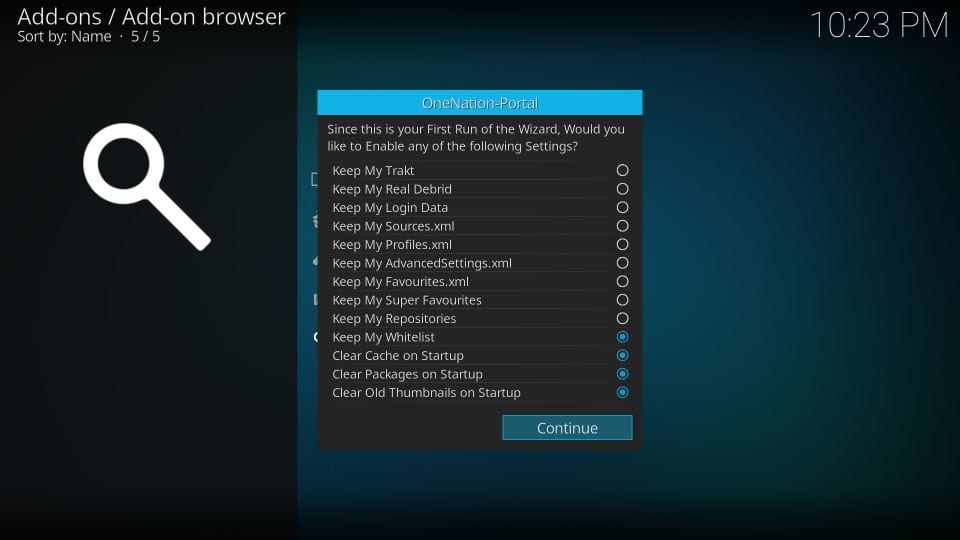
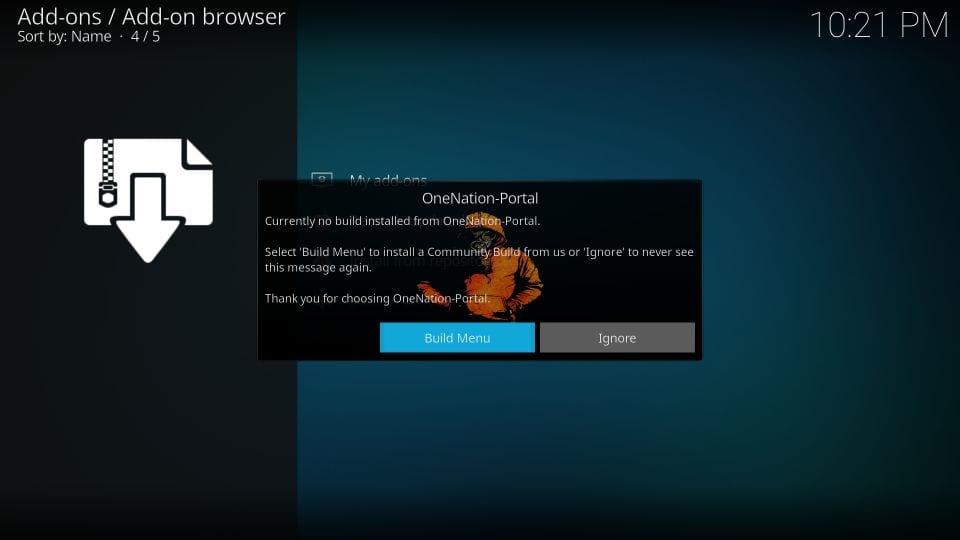
#20: Now, you see this popup. Click Build Menu and start installing Slamious Kodi build (skip to Step 23).
However, if you clicked Ignore and now need to access the Slamious build menu, follow the next two steps
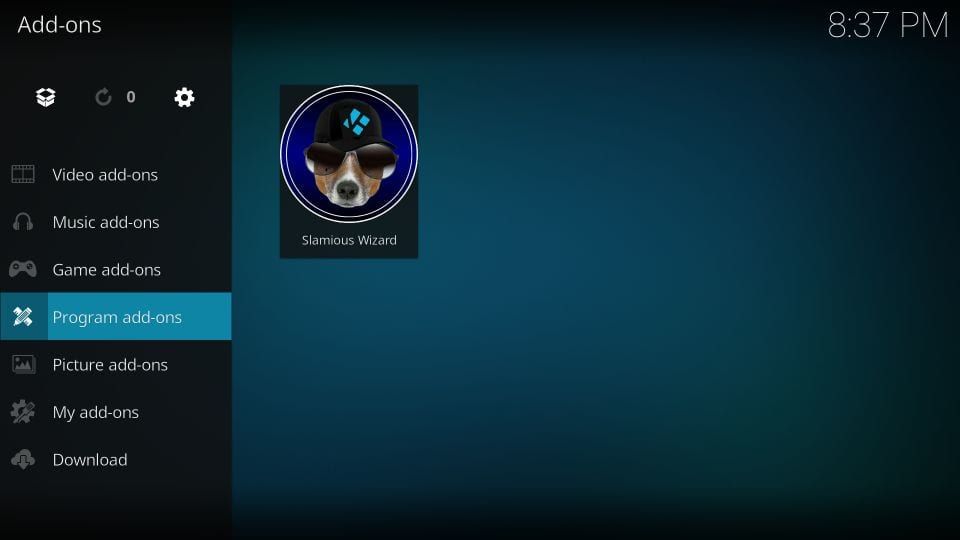
#21: Go to the Kodi home-screen and navigate to Add-ons > Program add-ons. Here, you will find the Slamious wizard. Click it!
#22: Next, click Builds
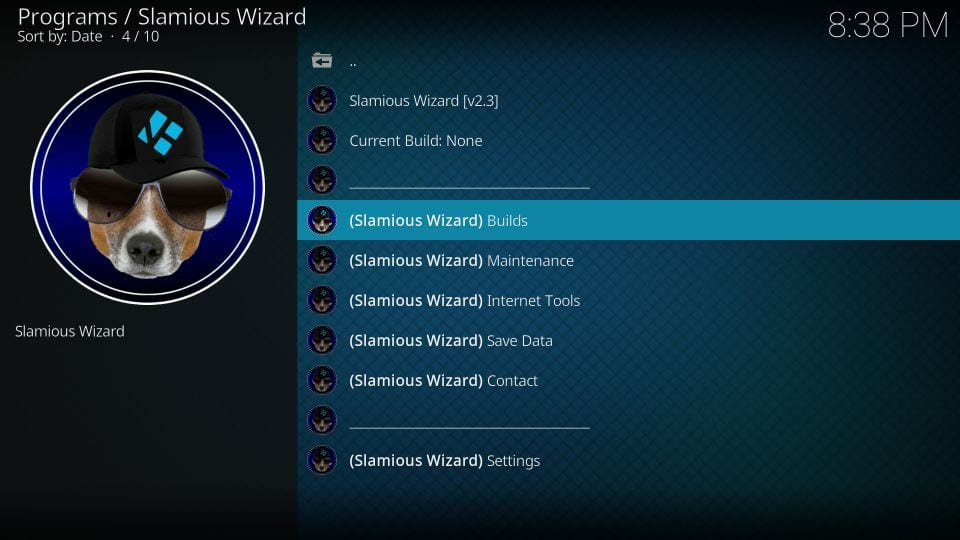
#23: Now, here is the Slamious Build Menu for you. Click the Slamious build
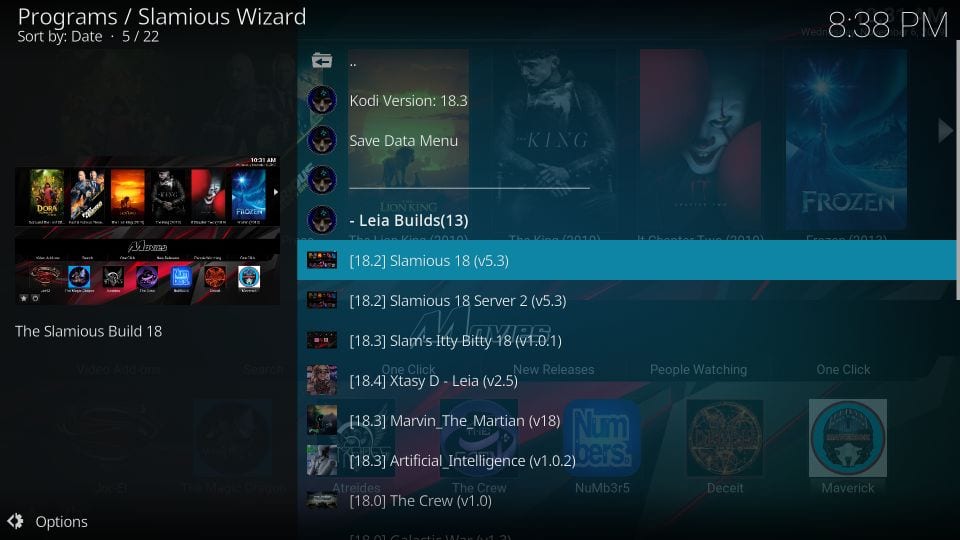
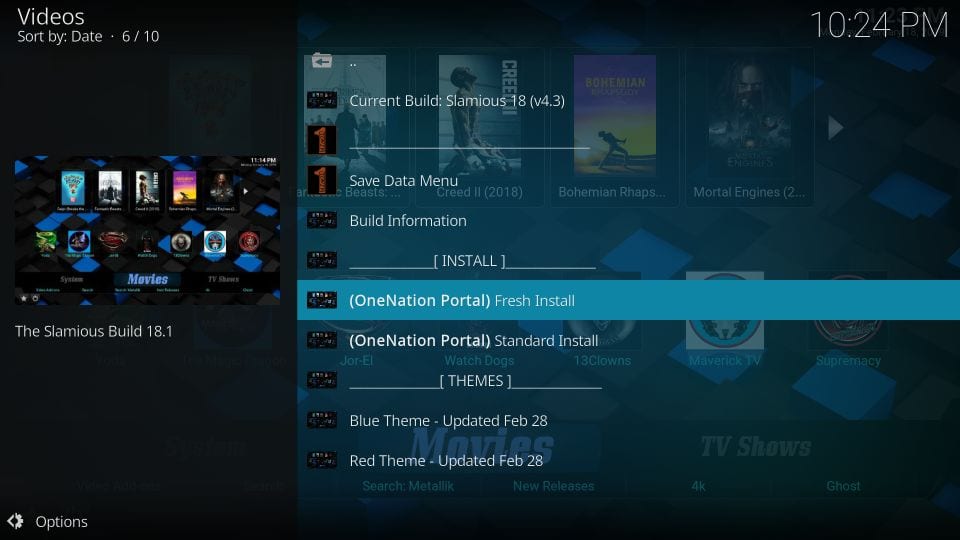
#24: You need to choose between Fresh Install and Standard Install
Fresh Install is always my personal choice because I believe any build works better when it is installed from scratch on Kodi
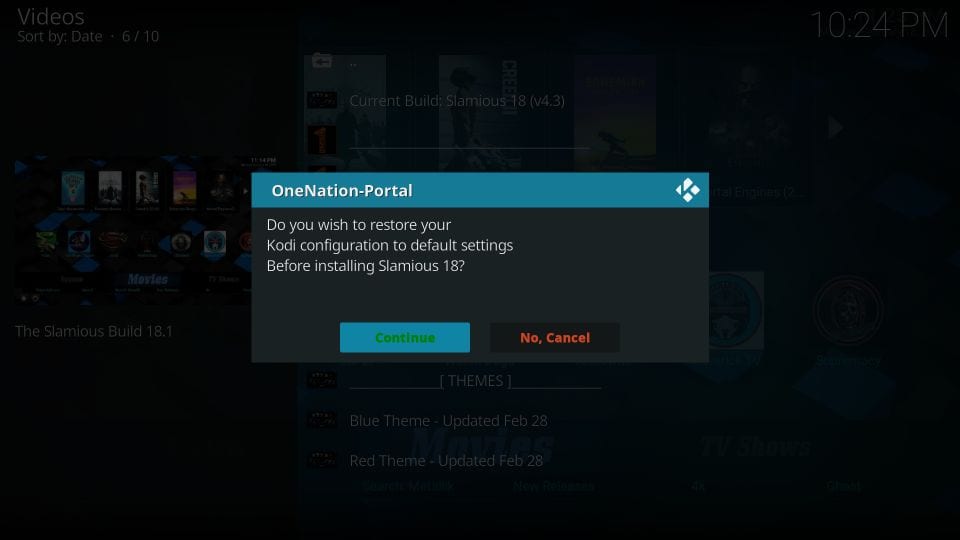
#25: If you chose Fresh Install, Kodi will confirm whether you wish to go ahead with your choice. Click Continue for your consent
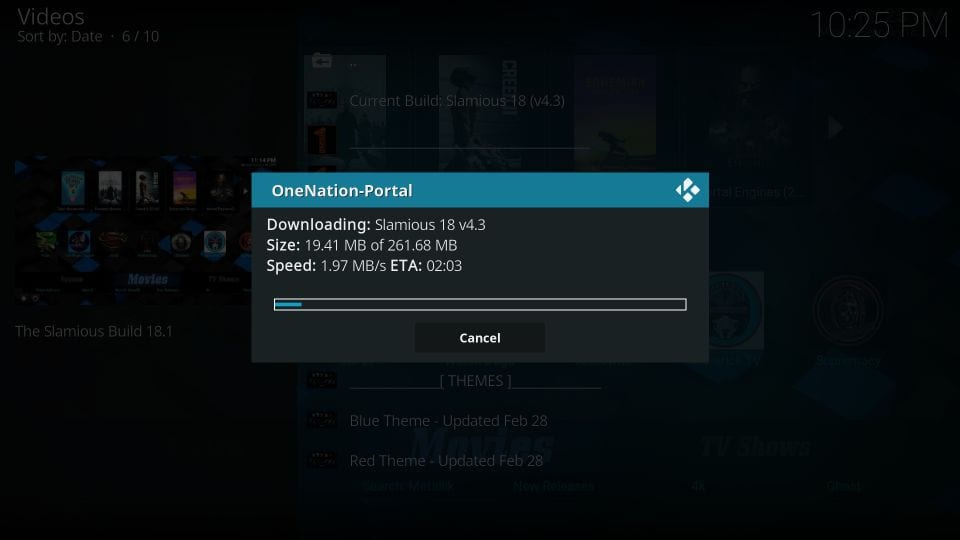
#26: The Slamious Wizard will first quickly wipe Kodi clean and then start downloading the Slamious Kodi Build. This usually takes two to three minutes. However, it may vary depending upon your network connection and device specs
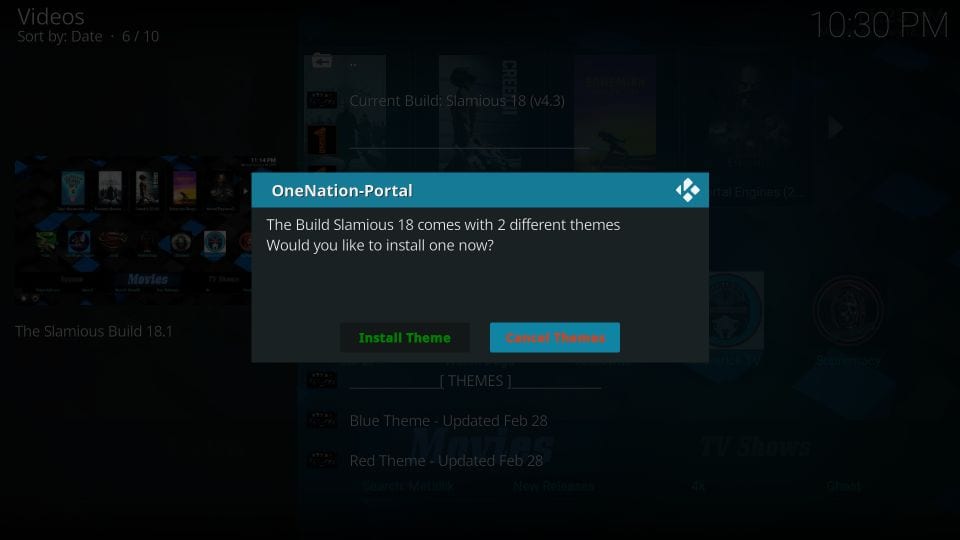
#27: Once the installation is finished, you will be asked if you wish to install any Slamious Kodi build theme. While writing this guide, there are 2 themes. You may go ahead with Install Theme or you may skip this step and install the theme later. I choose the latter.
Click Cancel Themes
#28: Now click Force Close when prompted
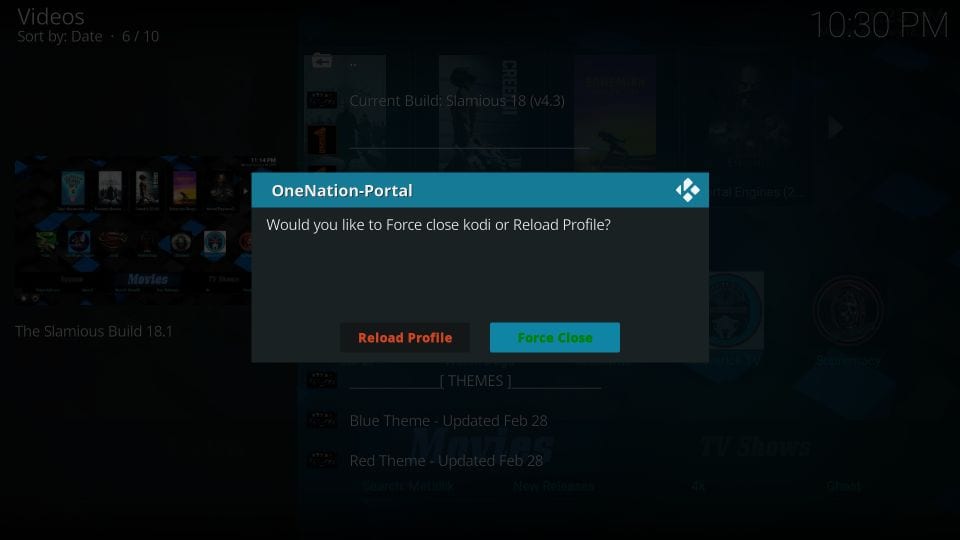
This is how you install Slamious build on Kodi from the Slamious Wizard.
Before you start streaming with Kodi Addons / Builds, I would like to warn you that everything you stream on Kodi is visible to your ISP and Government. This means, streaming copyrighted content (free movies, TV shows, Sports) might get you into legal trouble.
Kodi users are strongly advised to connect a VPN while streaming. A VPN for Kodi will bypass ISP throttling, Government Surveillance, and geo-restriction on popular Add-ons. I always connect ExpressVPN on all my streaming devices and I suggest you do the same.
ExpressVPN is the fastest and most secure VPN. It comes with a 30-day money-back guarantee. Meaning, you can use it freely for the first 30-days and if you are not satisfied with the performance (which is highly unlikely), you can ask for the full refund.
NOTE: We do not encourage the violation of the copyright laws. But, what if you end up streaming content from an illegitimate source unintentionally? It is not always easy to tell the difference between a legit and illegal source.
So, before you start streaming on Kodi, here’s how to get VPN protection in 3 simple steps.
Step 1: Get the ExpressVPN subscription HERE.
Step 2: Click HERE to download and install the ExpressVPN app on your device.
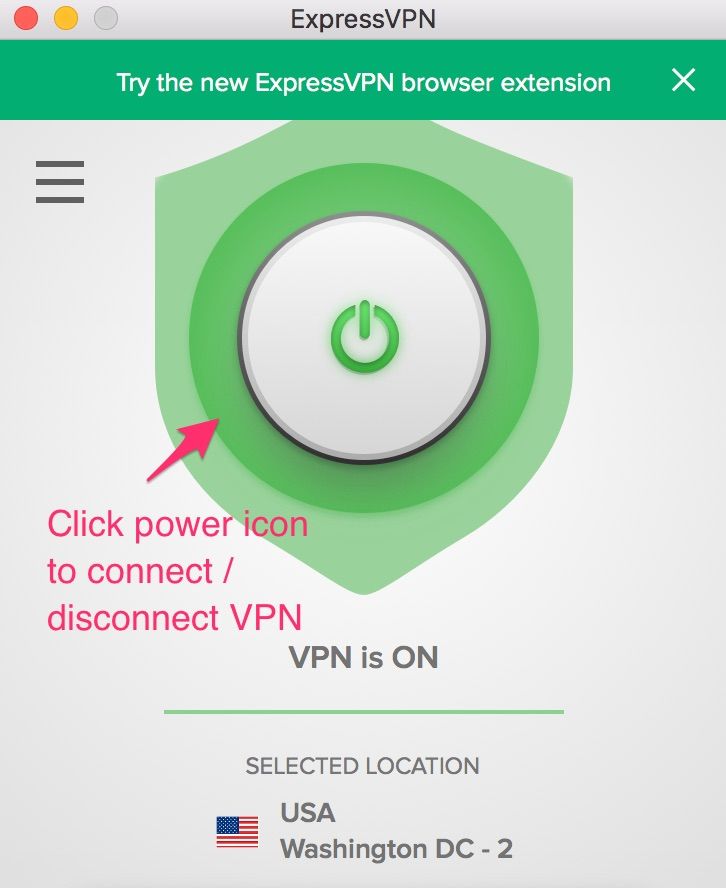
Step 3: Click the Power icon to connect a VPN server. That’s all. Your connection is now secure with the fastest and best VPN for Kodi.
Overview of the Slamious Kodi Build
Once you have installed the build, you can access it by reopening the Kodi application. You will be presented with the following home screen:
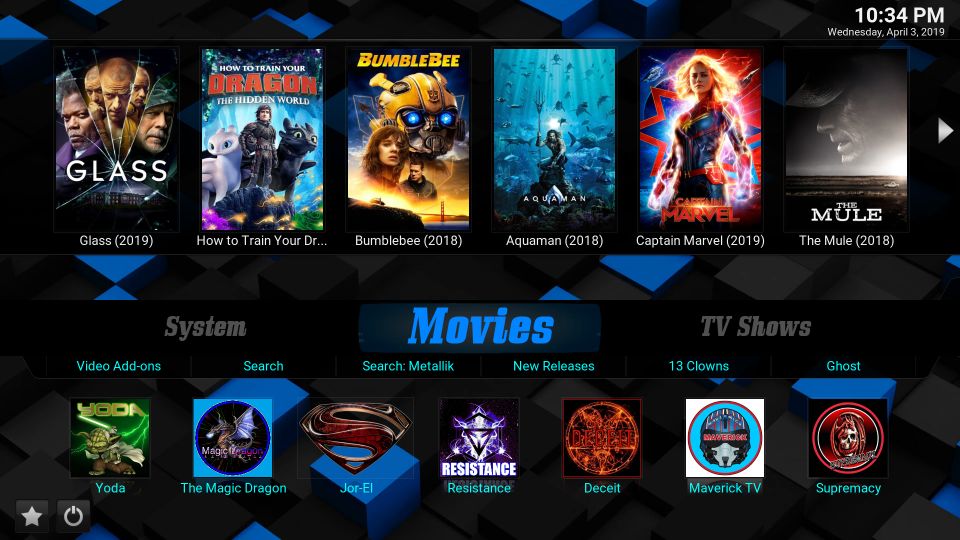
If this is the first run, please make sure you allow the build a few minutes to update its addons, plugins, and settings. This takes a bit, however, makes sure your build runs smoothly later.
Following are the categories on the main screen of the Slamious build that let you start streaming instantly:
- Movies
- TV Shows
- Live TV
- Sports
- Kids
- Music
These categories are lined up on the main menu bar on the main screen. Upon selecting a category, the submenu bar further displays the relevant option. For instance, in the screenshot above, I chose Movies and the related options including Video-addons, New Releases, etc. filled the submenu bar.
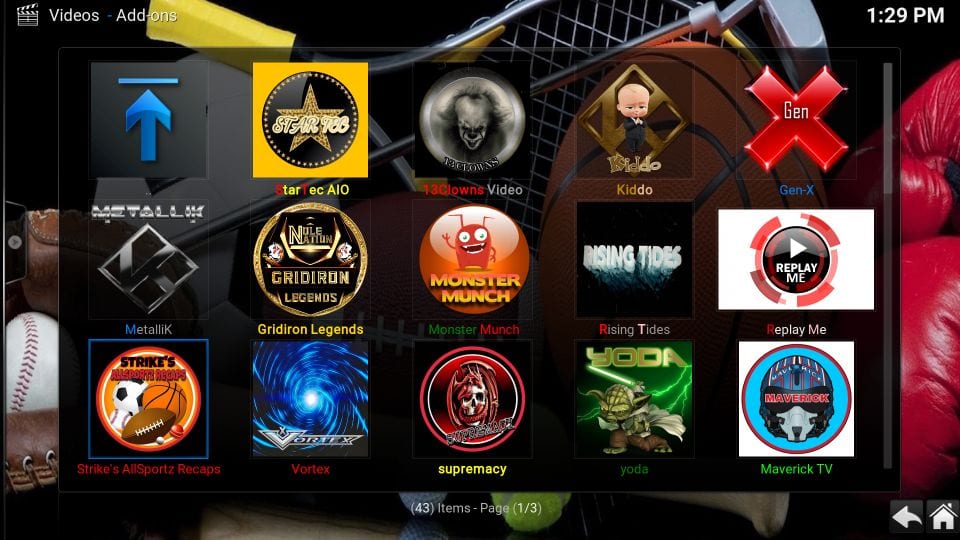
If you wish to explore the complete list of preinstalled addons that come with Slamious Kodi build, you can go to Add-ons > Video Add-ons from the main menu on the home screen.
Here is the list of some of the popular video addons available with Slamious:
- Yoda
- cCloud TV
- SportsDevil
- The Magic Dragon
Verdict
Slamious wizard is host to more than a dozen builds. I have tried many and believe that Slamious is one of their best. Let’s talk about addons first, one very important aspect of any Kodi build. Slamious packs plenty of preloaded addons as I have listed above. It lets you stream shows, movies, sports, live TV and more.
The user interface of the build is simple and yet appealing. Slamious Kodi build is fluid and allows you to ease through navigation. Overall, it is designed for great user experience. The build is lightweight too and hence works hassle-free on low-RAM devices as well.
Related:
How to Install Kodi on FireStick
How to Update Kodi
How to Use Kodi
How to Reset Kodi

16.04.2023 @ 15:37
s screen. Click on it to install Slamious Wizard #11: Wait for the notification that says Slamious Wizard Add-on installed #12: Now, go back to the Kodi home screen and click Add-ons again #13: Click on the open box icon in the upper left corner #14: Select Install from repository #15: Choose Slamious Wizard Repository #16: Click on Program add-ons #17: Select Slamious Wizard #18: Click on Install #19: Wait for the notification that says Slamious Wizard Add-on installed #20: Click on Continue #21: Select Build Menu #22: Choose Slamious Build #23: Click on Install #24: Wait for the notification that says Slamious Build Add-on installed Congratulations! You have successfully installed Slamious Build on Kodi. Enjoy streaming your favorite content with this amazing build.